lab03 : More functions and drawing with Turtle Graphics
| num | ready? | description | assigned | due |
|---|---|---|---|---|
| lab03 | true | More functions and drawing with Turtle Graphics | Mon 08/14 12:00PM | Wed 08/16 03:00PM |
If you find typos or problems with the lab instructions, please report them on Piazza
Goal
The goal of this exercise is to practice test-driven code development using the unittest framework as well as making cool drawings with Turtle Graphics in Python to make particular shapes.
Work with your assigned pair programming partner on this lab. If you do not have one, consult with the instructors before starting.
Setting up your git repo for lab03
Create a joint git repo for you and your partner for lab03, following Step 2 in the lab02 writeup. Assuming that you have done the one time configurations related to your ACMS account, clone your newly created private repo following Step 4 of lab02.
What you’ll be drawing
You’ll be drawing functions to produce your initials. For example, if your name is Pat Brady, and your pair partner is Chris Jimenez, your initials are PB and CJ.
In this case, the functions you’ll write are:
- drawP(theTurtle, width, height)
- drawB(theTurtle, width, height)
- drawC(theTurtle, width, height)
- drawJ(theTurtle, width, height)
Then, you’ll write two more functions:
- drawInitialsPB(theTurtle, letterWidth, letterHeight, letterSpacing)
- drawInitialsCJ(theTurtle, letterWidth, letterHeight, letterSpacing)
In the event that you are paired with someone that shares one or more initials with you (e.g. if Riley Jones and Chris Jimenez are partners, they share the letter J), you might have to write fewer functions. However, we’ll avoid that, because we want you to get lots of practice. If you share one or more initials, please use your middle initials to get to four unique letters (and mention in your code comments what your middle name is in that case). So basically, combine the first, last and possibly middle initials (if needed), of yourself and your pair partner, to arrive at four unique letters.
You’ll also write a function called go() that draws each members of the pair initials three times each, at different sizes.
Programming, Step-by-Step
You should be sitting WITH YOUR PAIR PARTNER to start this part of the assignment.
Follow these steps to complete the assignment
Step 0: Decide on initial driver/navigator
The initial driver will be the one that is typing on the computer.
- If you are both sitting in front of computers, one of you please CLOSE YOUR COMPUTER NOW. You should both be sitting at the SAME COMPUTER.
- If you are both logged in, the temptation to “not really do pair programming” will be too great, at least until you are used to the system.
Step 1: Try out the Turtle library
The Python Turtle library lets you draw on a canvas, by moving around a little turtle. Simple commands make the turtle move and turn and it draws as it goes.
But before you start with your own turtle, let’s show you a simple example. Bring up IDLE. Create a new file called “turtletest.py” in your repo. To do this, in IDLE go to the menu option File-> New. Then continue with the following steps.
First add this code to import the turtle library:
import turtle
This above line tells Python about the turtle library and allows you to call its functions. The function below does the actually drawing. Copy the following code into your file.
def drawPicture():

	''' Draw a simple picture using a turtle '''

    turtle.forward(100)

    turtle.left(90)

    turtle.forward(100)

    turtle.left(90)

    turtle.forward(100)

    turtle.left(90)

    turtle.forward(100)

    turtle.left(90)

drawPicture()
What happens when you run your file?
Modify the function in various ways to see what happens:
Change the number in the first turtle.forward() call in the drawPicture function. What’s the role of the number?
Change the values in the calls to turtle.left(). What units are being used?
Referring the turtle documentation
It’s a good idea to check out the library documentation (a.k.a. reference manual, API docs, etc.) when you’re learning how to use a new library (set of methods). Google can be very helpful when exploring a new tool. Here are a couple of links that can help you get started drawing pictures and seeing what’s possible.
Here’s the entry in the documentation for the function that lets us move forward:
turtle.forward(distance) turtle.fd(distance)
Parameters: distance – a number (integer or float) Move the turtle forward by the specified distance, in the direction the turtle is headed.
Don’t forget to save your work often and to add helpful comments to your code. And, of course, if you get stuck, ask for help.
Next, you’ll use a turtle to draw your initials.
Step 2: PLAN your letters on paper
Plan your drawing. For each letter that you and your pair partner are going to draw, start by drawing a bounding box like this on a piece of paper. Trade off: each of you should do the planning for the letters for your OWN name, with your pair partner watching and making helpful suggestions.
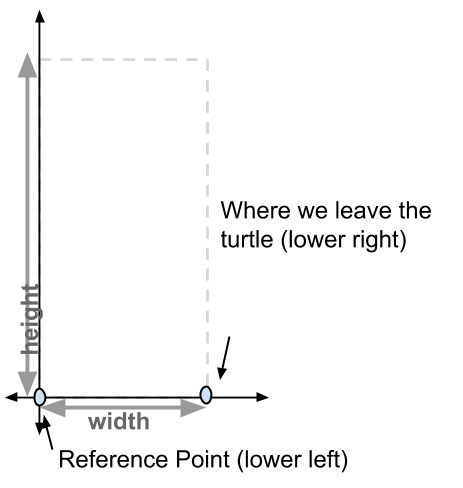
For example, for the name, Phill Conrad, I might plan out bounding boxes like these. Here, I’ve chosen each of the important points, and labelled them. Note, though, that these are only examples. I don’t expect that everyone with a P or a C in their name will make the same choices about how to shape the letters. In fact, I hope each of you will make slightly different choices.
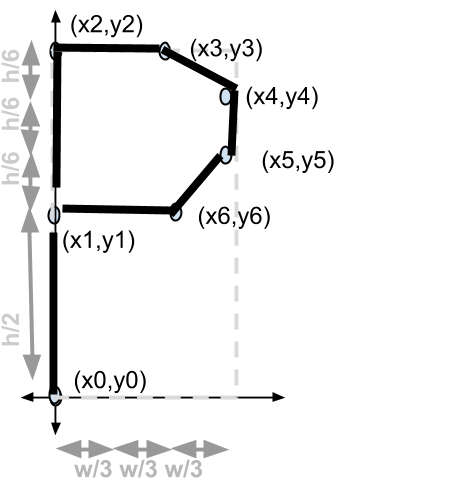
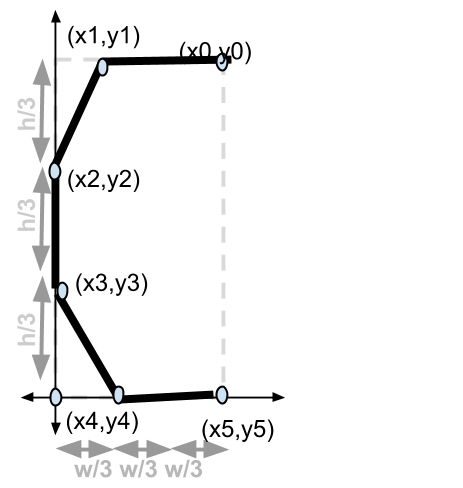
For instance, as an alternative, I might use bounding boxes like these:
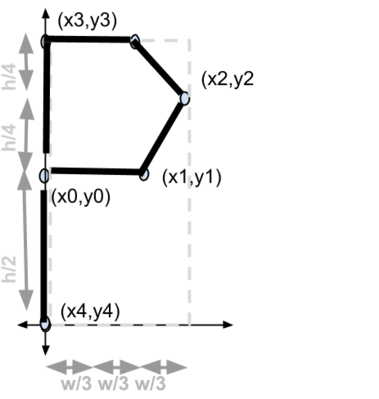
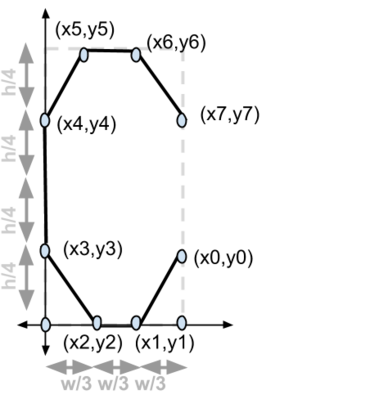
Or even these, if I get ambitious, and want to try to make rounded shapes using the turtle’s circle function (note: that’s a link to the documentation!)
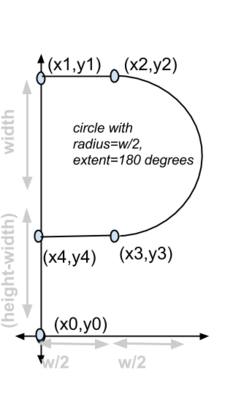
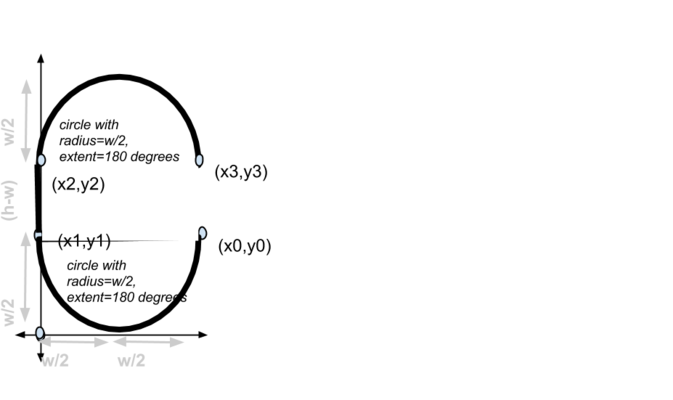
A warning about that last approach: although it may seem like it isn’t that tough, there are some subtle traps. For example, in the C, what if we are drawing a short, fat C where height > width? Then h-w will be negative, and there may be “issues”. You might find that you would need more than one drawing, one for when (h-w)>0, and a different approach when (h-w)<0, and then use an if/else statement in your drawing code. It might be better to stick to approaches that don’t involve interaction between height and width, which probably means straight lines. If you and your partner are up for the challenge of using curves and circles, you are welcome to try, but I advocate trying the straight line approach FIRST just to be safe.
Once you’ve planned your letters on paper, you are ready to start coding.
Step 3: Driver gets things started on first letter
Create a new file called “lab03.py” in your repo, and start creating a function definition for your first inital.
- If the initial is A, the function should be called drawA. If it is a C, it should be called drawC, etc.
- The function should take there parameters: the name of a turtle, a width, and a height.
- Start the function with a docstring (a sandwich where the bread is three double quotes
"""and the innards are a text comment indicating what the function does:
Example:
def drawA(someTurtle, width, height):
   """
   draw the letter A using someTurtle, with some width and height
   """

  # Find my starting point
  xStart = someTurtle.xcor()
  yStart = someTurtle.ycor()

  # The rest is up to you to figure out
At the top of your file, add this comment (with your names), and the import turtle line, and save the file as lab03.py. (The function def for drawA or whatever your first initial is that you are trying to draw goes below that point, as shown:
# lab03.py for Alice Baker and Chris Gaucho
# Draw some initials using turtle graphics

import turtle

def drawA ... etc...
Now at the bottom of your file, make a go() function that you can type in at the Python prompt to make everything happen when you run your program, and outside that function (i.e. NOT indented), a line that creates a turtle. In my example, I called my Turtle fred, but may use any name you like:
That will look like this:
fred = turtle.Turtle()
def go():
     drawA(fred, 50, 100)
The advantage of declaring fred the turtle outside of the function definition is that your Turtle Graphics window will appear on the screen as soon as you hit F5 or select Run from the Run Module menu. That can make it easier to debug your code, because you can arrange your windows so that you can SEE the Turtle move when you type go().
Now save your file, and try running it. You should see a Turtle pop up, but unless/until you put more code in your drawA function, the turtle is going to just sit there.
Your next task: start adding code into your first initial drawing routine so that it draws an initial. My suggestion is to NOT wait until you have the whole thing done to test—instead, work with one or two points at a time, and one or two line segments at a time, and after each one is added, try to run and see if what you have so far is working.
As you code, put a comment before each step, that explains in English what you are doing.
Step 4: Draw the remaining letters
When your first initial looks good, its time to try the next one.
Suppose the second initial is B. Right under your function definition for drawA, but before your function definition for go, add a function definitions for drawB (or whatever your next initial is):
def drawB(datTurtle, width, height):
   """
   draw the letter B using datTurtle, with some width and height
   """

  # Find my starting point
  xStart = datTurtle.xcor()
  yStart = datTurtle.ycor()

  # The rest is up to you to figure out
A word about variable name choices
Note that the parameter name for the turtle in the function definition can be aTurtle, datTurtle, someOlTurtle, t, or really (just about) anything. It helps if the name is suggestive that it is the “role” of a turtle that is drawing our letter. But there is no python “rule” about what this name should be, other than:
- it must be a legal variable name: starts with a letter or underscore, and consists of letters, digits and/ or underscores (see http://www.w3resource.com/python/python-variable.php )
- can’t be names already used for something else (e.g.
turtleis no good, because its the name of theturtlemodule we are importing.
Same for width and height–you can call them w and h, or wd and ht, or xsize and ysize: whatever makes sense to you.
All that is required is that:
- your letter drawing functions have exactly three parameters, that represent, in this order, the turtle, the width and the height
- that the names be somewhat reasonable–a reasonable person should be able to guess what they are for from the names.
So calling them (pickle, tomato, cucumber) is not ok—you could make it work, but it is “bad style”.
But (turt, wid, hght) is fine, as is (t, w, h), or (aTurtle, width, height).
Step 5: Testing your first and second letters
To test your first and second drawing function, add code into your go() function, like this:
def go():
     fred = turtle.Turtle()
     drawA(fred, 50, 100)

     fred.forward(25)
     drawB(fred, 50, 100)
Or, you may even want to comment out the drawA call while you work on the B:
def go():
     fred = turtle.Turtle()
     # drawA(fred, 50, 100)

     drawB(fred, 50, 100)
In any case, repeat this for all of the initials you need to draw.
AS YOU WORK, SWITCH DRIVER AND NAVIGATOR FREQUENTLY. Each member of the team should be the driver for the function for at least one their own initials.
Repeat the steps above until you have all your letters done, and switch driver/navigator between each function. Then you are ready for the combining steps.
Step 6: The step where you combine things
In this step, you are going to write two new functions, for each of the initials of the members of the pair.
For example, for Phill Conrad, the function is :
def drawPC(aTurtle, letterWidth, letterHeight, spacing):
   """
   draw the letters PC, using aTurtle, and the width and height given.  Use spacing * width as the space between letters.
   For example, if spacing is 0.5, then the space between the right edge of the P and the left edge of the C
   should be half of the average letter width.  If spacing is 1, it should be the same as the average letter width, and
   if it is 2, it should be double the letter width.

   """

   # draw the P

   drawP(aTurtle, letterWidth, letterHeight)

   # do something here to space out the letters--you figure it out


   # draw the C

   drawC(aTurtle, letterWidth, letterHeight)
Your functions will look just like these, except that probably you’ll have different letters. And you have to figure out the thing to do in between the letters (it’s not that hard.)
Add them after your draw functions for each letter, but before your go() function.
AS YOU WORK, SWITCH DRIVER AND NAVIGATOR FREQUENTLY. Each member of the team should be the driver for the function for their own initials.
Then, modify your go() function so that it draws each member of your team’s initials, at least three times each, with DIFFERENT widths, heights, and spacings. You’ll need to pick up the pen between calls to drawXM() or drawPC() or drawJH() or whatever. And choose starting points (using t.goto(x,y)) so that all of the initials are on the screen, and none of them overlap.
When that’s done, you are ready to do your finalcheck list on your code before submission, and then use the git command line to submit.
Step 7: Final Checklist
Here’s your final checklist.
- Do you have a comment at the top of your file?
- Do you have a draw function for each of your initials?
- Does each of these functions have three parameters, a turtle, a width and a height?
- Does each of these have a reasonable docstring (see discussion in step 2.)
- Does each of your letter drawing functions have parameters names that are reasonable? (See pickle, tomato, cucumber discussion at step 5.)
- Does each of your letter drawing functions have comments throughout explaining the steps you are taking to draw, in plain English? (See discussion in Step 2, and the example code from lecture.)
- Does each letter drawing function assume that the turtle starts at lower left, pen down, pointing right, and leave the turtle at lower right, pointing right, pen down?
- Do you have a draw function for each pair of initials?
- Do your draw functions work for pairs of initials
- Does each of your draw functions for pairs of initial have reasonable variables names, and good comments?
- Does each of your draw functions have a reasonable docstring?
- Is the spacing between letters handled correctly?
- Do you have a go() function?
- Does your go() function have a reasonable docstring?
- Does your go() function call your initial functions, three times each, with different parameter values for width and height each time?
- Do all the initials appear in each of the three appearances, not overlapping each other, and do they all appear on the screen?
If so, you are ready to submit!
NOTE: Only one member of each pair has to submit, but BOTH members of the pair are responsible to make sure the submit happens.
Step 7: Submit to github
To submit, use the command line tools git add, git commit and git push. You must only push working versions of your code. Make sure your code is pushed to git by navigating to your repo on github.com and viewing your latest changes.
Congratulations on finishing lab 3!!! Hope you had fun with turtle graphics!
Additional Fun with Turtle
When you are finished with the main part of lab03, here is an extension that you can start working on, and continue to contribute to throughout SPIS.
You are invited to create a public github repo under the ucsd-cse-spis-2017 organization with this naming convention:
spis16-drawings-Name-Name(e.g.spis16-drawings-Alex-Chris)
In this repo, you can add files that provide drawing routines to draw whatever you like.
You can use the code from https://github.com/ucsd-cse-spis-2017/spis16-lecture-0809 as a model.
Then, try looking at the code from some of your fellow classmates public spis16-drawings... repos.
See if you can copy some of their files into your repo (add a comment indicating where the code came from, e.g.
# This file copied from spis16-drawings-Alex-Chris
Then try using import to get access to those functions, and use them in your own drawings.
See how creative you can get in terms of combining different drawings together from many other fellow SPISers.
Put the code for these additional “mash-ups” in the same spis16-drawings-Name-Name repo, just perhaps in a different python file, e.g. mashups.py.