lab04 : Recursion and fractals with Turtle
| num | ready? | description | assigned | due |
|---|---|---|---|---|
| lab04 | true | Recursion and fractals with Turtle | Tue 08/15 09:00AM | Fri 08/18 04:00PM |
If you find typos or problems with the lab instructions, please report them on Piazza.
Learning Goals
In this lab you will practice some of the key concepts from Chapter 4 of Guttag. This includes writing parameterized functions, developing test code and solving problems using recursion. You’ll do some warm up recursive programs, predict and test what they do, and then top it all off by creating some very cool fractal art.
Your learning goals are:
- Determine the base case and recursive step in a recursive solution.
- Implement this recursive solution in Python.
- Learn to reason about your program, and justify its correctness.
- Find and fix errors in simple Python functions.
- Trace the value of variables in Python code.
- Reason about the quality and completeness of test cases.
- Use geometry and turtle graphics to draw fractals in Python.
Work Flow
-
Step 1: Read Chapter 4 of Guttag, Sections 4.1 - 4.5
-
Step 2: Create a new private github repo under the “ucsd-cse-spis-2017” organization. However, the instructions are a little different this time, since we will be providing you with some starter code.
-
Step 3: For each of the programming exercises in this lab come up with a solution outline by discussing with your partner. Don’t be in a hurry to start coding unless you have a fairly clear idea of a solution strategy.
-
Step 4: Unit test your code as you write new code using the unittest framework
-
Step 5: Commit your code frequently. Push working versions of your code to github.
Developing code is an iterative process. Your code will probably not work as expected on the very first try. Don’t be dismayed. Work through your code to identify bugs, test new code frequently and seek help if you feel you are stuck!
Setting up your repo
The way that you create the repo will be a little different this time, since we have “starter code” available for you.
Instead of creating the repo from scratch, you’ll set up the repo with Method 1, importing the starter code from this link: https://github.com/ucsd-cse-spis-2017/lab04-startercode.git
The name of your repo should be spis17-lab04-Name1-Name2 where the Name1-Name2 part matches the Pair Name column of the Pairs table from the SPIS FOCS Website, as we have done for the previous labs.
Programming Exercises
Let’s begin with our very first exercise which is a warmup on recursion.
Multiply without the ‘*’ operator
We’re going to write a recursive function that multiplies two integers without using the * (multiply) operator, only + (addition). Your program should work for positive, and negative values of ‘a’ and ‘b’. For now, let’s consider the case where ‘b’ takes only non-negative values and ‘a’ may be positive, negative or zero. Recognize that:
a * b = a + a + a + … + a (with b copies of a added together)
E.g.,
3 * 4 = 3 + 3 + 3 + 3
In other words, we want to define a function recProduct(a, b) which will have integers as arguments and will return the product of its arguments. But, the function won’t use the operation *.
Just for practice, take a minute to (a) determine the base case and (b) write the recursive step without looking below. After you’ve got it, read on. If you don’t know where to start, please ask for help. Scroll down when you have an answer.
Your base case probably looks something like:
a * 0 = 0
That is, when b is 0, then the product of 0 times any number is 0.
Your recursive step should be something like:
a * b = a + a * (b-1)
Bring up idle3, and open “recursiveFuncs.py” and “test_recursiveFuncs.py”. These two files were part the starter code for your repo. Note that the code is still incomplete. Now, implement the recursive multiplication function recProduct(a,b) in “recursiveFuncs.py”. Once you have that, its time to test you code using the unittest framework (see lab02). The file “test_recursiveFuncs.py” is where you unit test your code.
For example check that your program does the following:
recProduct(0,5) returns 0
recProduct(1,5) returns 5
recProduct(-1,5) returns -5
If any of your test cases fail, it means either there is an error in your code or your code doesn’t cover that particular case and you need to write additional code. You have to re-examine your code and figure out what is wrong. This process is known as debugging. If you are not sure how to debug your code, refer to this link to begin debugging your code in a systematic way.
Once you have tested your code for the cases where the parameter b is non-negative, while a is any integer that maybe positive, negative or zero, try to write a few additional test cases where the parameters b is negative. Here are a few example cases:
recProduct(5,-1) should return -5
recProduct(-5,-1) should return 5
If your code passes these cases, great! If not implement the logic needed to handle the case where b is negative. After you are done, consider refractoring your code to arrive at an elegant and concise solution.
Recursive Rendering
It is time for you to start showing off your skills visually. You will do this by writing programs to create cool fractal art, which is based on internal self-similarity.
We’ll start by creating two classical fractals: a spiral and a tree. Afterward, try your hand at creating snowflakes too, or any fractals beyond the problems below!
The Python Turtle Library
You’ve already started playing with Python’s Turtle library in the previous lab. For more information on the turtle library refer to the documentation on the turtle library.
In your git repo create a file called “recursiveDrawings.py” and put all your code for this lab in that file. Remember, to be able to use our turtle, we need to import the turtle library:
import turtle
Draw a Spiral
In the file “recursiveDrawings.py” add a stub for the spiral function which has the following signature.
spiral(initialLength, angle, multiplier)
The function takes as arguments an initialLength of the spiral’s first line segment, an angle specifying the degree of the angle formed by neighboring segments, and a multiplier indicating how each segment changes in size from the previous one. For example, the following are example screenshots from the call spiral(100, 90, 0.9) and spiral(1, -45, 1.1), respectively:
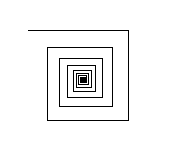
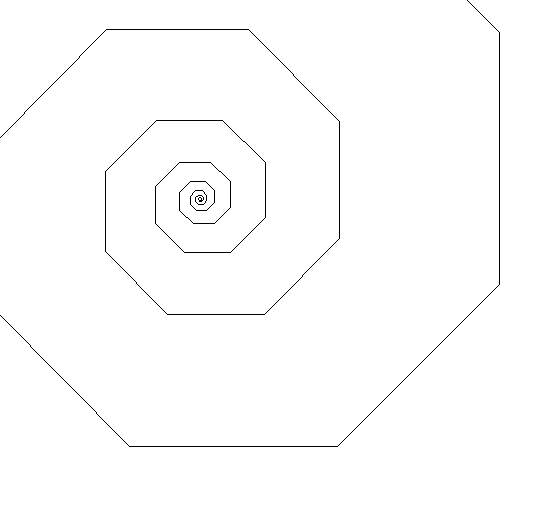
Notice that the angle is specified in degrees.
In the first call the fractal starts from the center with initialLength 100 pixels. It turns right by 90 degrees when it needs to draw a successive segment whose length is 0.9 times that of the previous one. In the second one, the fractal starts from the center with initialLength 1 pixel. Each iteration the line turns left by 45 degree and draw a segment whose length is 1.1 times longer.
Note the spiral function can be computed inside-out, or outside-in, depending on the multiplier, therefore the base case varies. The spiral should stop drawing when it has reached a side lengh of less than 1 pixel (if multiplier<1) or greater than 200 pixels (if multiplier>1).
Implement the function and use it to draw an interesting spiral of your own.
Help! Stack Overflow! Do not be alarmed if you find you are getting stack overflow errors when you try to run the “growing spiral” example above. This error is caused by an infinite recursion. I.e. a recursion that never hits its base case. Not sure why? This is a perfect time to practice some of those debugging skills you learned above. :) Ask a tutor if you need help.
Grow a Tree
Next, you will write the tree function. It has the following signature:
tree(trunkLength, height)
The function takes as arguments: a trunkLength which is the length of the main trunk of the tree, and the height indicating the number of levels of branching of the tree. For example, the following is an example screenshot from the call to tree(200, 4):
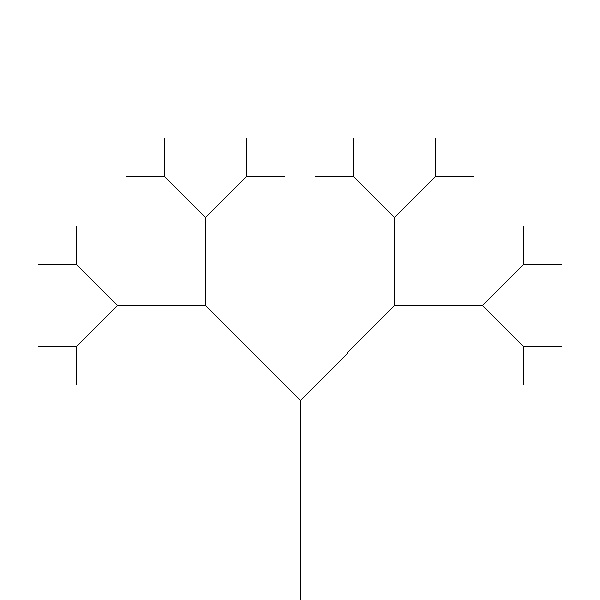
The tree “grows” from the ground of the world, with initial length of the first trunk 200 pixels. At the end of the first segment, the trunk forks into two directions. The forked trunk in each direction has a shorter length and continues to fork at the end, until the tree has forked 4 times.
Think about the base case and its recursive steps before implementing the function.
Your tree will be personalized by the aesthetic choices you make about the number of branches at each fork (anything greater than 1 is OK), the exact angle of branching, the reduction of trunkLength in sub-branches. Your tree is planted on the ground and should grow upward.
Draw some interesting trees using your function.
Create Snowflakes … in San Diego!
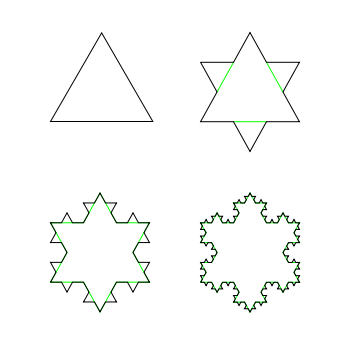
By now you should be very skilled at creating fractals using recursions. Congratulations! Now you can do much more, even making it snow during summer in sunny San Diego! In this exercise you will create the following snowflake structure (a.k.a. Koch Snowflake).
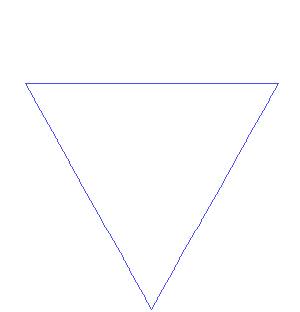
As the animation shows, the Koch snowflake begins with an equilateral triangle; at each stage, the middle third of each line segment is replaced by a pair of line segments that can, together with the replaced segment, form an equilateral triangle; then the replacement will be performed again on all the component line segments of the newly created shape, over and over.
We will draw the Koch Snowflake by first defining the snowflake function with the following signature:
snowflake(sideLength, levels)
which takes as arguments: a sideLength of the initial equilateral triangle, and the levels indicating the number of recursive levels performed to create the final snowflake. Observe that the base case is simply an equilateral triangle with side length equal to sideLength. Each increment of level replaces the middle third of all of the snowflake’s sides with a “bump” that is, itself, a smaller equilateral triangle.
Hint: It might be useful to write a helper function with the following signature:
snowflakeSide(sideLength, levels)
The above functions should draw just one side of the underlying equilateral triangle – along with all of its squiggles or bumps, recursively!
All of the recursion will then be in snowflakeSide. So, first try creating snowflakeSide and make sure that it works and draws a single side of the snowflake curve at the appropriate level of recursion. Once snowflakeSide works, then your snowflake function will call snowflakeSide three times, with appropriate angles between them.
Again, in this strategy, all of the recursion occurs in snowflakeSide. Remember that if levels is zero, then snowflakeSide should produce a single line segment (this will be the base case of the recursion); otherwise, snowflakeSide needs to call itself four times; and, keep in mind that you’re only creating one of the three sides of the snowflake! Here are images of four steps (after three levels of recursions) of the overall Koch curve’s progression. The first one, the triangle, corresponds to the snowflake with levels = 0 (for snowflake() and snowflakeSide()), with the subsequent ones represent the Koch snowflake with levels = 1, 2 and 3 respectively.
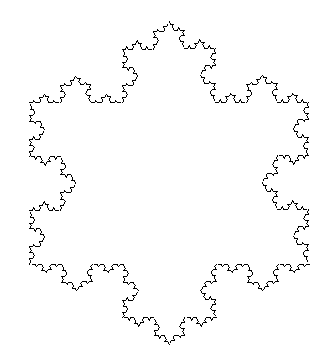
Test your implementation by calling snowflake(280, 4); you should get the following snowflake:
Drawing the snowflake is challenging. If you have completed this exercise consider it a major accomplishment!! Congratulations!!!
More fractal fun (optional)
If you want to go still deeper into fractals and recursion, get creative drawing new fractals. There is a general way to recursively create many types of fractals, called fractal decomposition. One starts with a shape oriented in a space along with a replacement rule which is used to refine the picture. One useful (but optional) rule of thumb is to not remove any shapes once they have been put down, but only to add on to what already exists. Another is to use different replacement rules with various probabilities. Try several of these out, and figure out what kinds of rules lead to beautiful designs. Put all of your code for the optional fractal drawing in a new file called “fractalChallenge.py”.
A list of famous, and intensively studied, fractals is available http://en.wikipedia.org/wiki/List_of_fractals_by_Hausdorff_dimension .
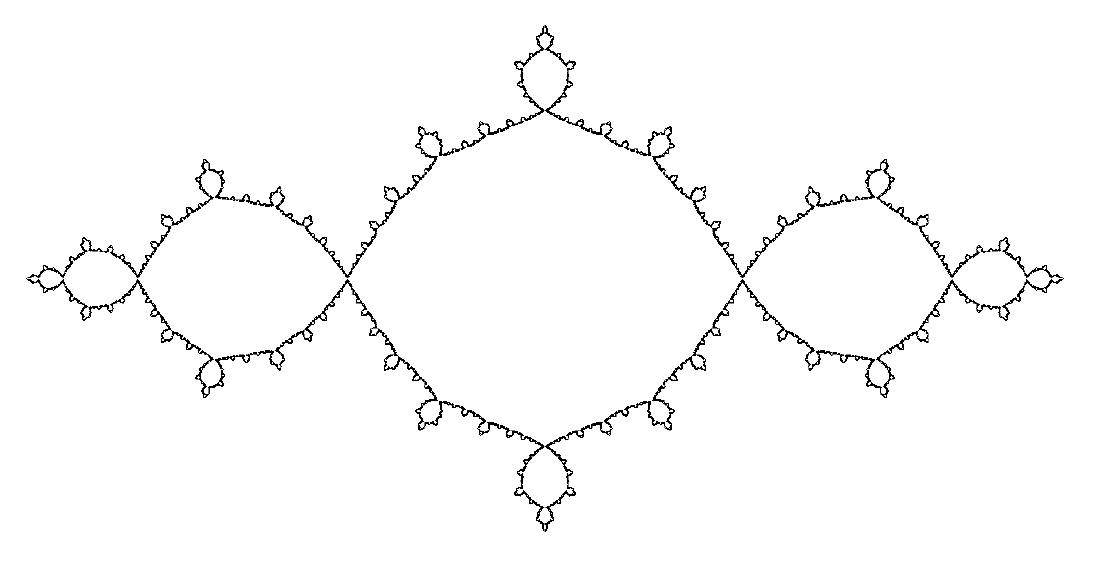
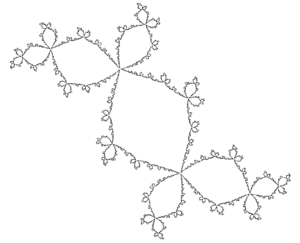
Here are some pictures for inspiration:


Additional exercises
When you have completed lab 4, you can continue working on the fun group drawing project that you started in lab 3.
We presume that you have already created the public repo spis17-drawings-Name1-Name2.
If you haven’t refer to the instructions at the end of lab 3.
Continue adding new files and functions that draw interesting fractals to that repo. Please DO NOT include the code for the (spiral, tree and snowflake) in your public repo. We don’t want spoilers for the SPISERS who may still be working on the core lab 4 exercises.
We also encourage you to continue creating interesting mashup art from the routines that you and your peers have implemented in your public drawing repo.
Great job working through lab 4. Feel free to move on to the next lab.